There haven’t been many blog posts the last years but that hasn’t meant that we have not done anything, quite the opposite! I have been super busy with making the first serial batch of the Polhem Haptics device, and shipping to the first three devices to customers. In parallell we have worked on incorporating Haptikfabriken (more on that to come!) and also consulting on web applications for executive e-learning, a video sharing service for feedback by coaches on how to improve your speeches, and a movie streaming service.
Now it is the time to expand so we can do even more, and deliver continuous services better. The current job offering is posted on Jobs tab, and requires Swedish (due to the local main customer in this case), so I wrote it in Swedish. Share to your friends!
Nvidia 3D vision is (or was…) a cost-effective way to get stereoscopic 3D on an ordinary gaming PC in windows, or with a professional Quadro graphics card, to do the same in Linux. One cool thing it can be used for is to run a Co-location Display, where haptics and visual imagery is co-located so you can touch things exactly where you see them.
Nvidia is discontinuing the product and latest drivers lack support. But it still works! While it is getting more difficult to get your hands on a 3D Vision kit to run active 3D stereo, you can actually get it to work on a modern Windows 10 computer – in fact even on a laptop – if you hook it up to an external 120hz monitor with 3D Vision support. A good thing is also that while Nvidia is discontinuing the product, they are maintaining their drivers until April this year, and you may be able to work with them for a while afterwards too – and – compared to some while back you can now run real Quad Buffered Stereo even if you have a consumer-grade GeForce graphics card.
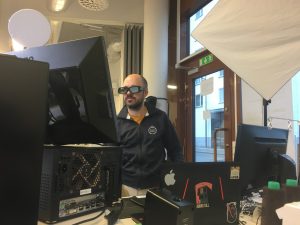
Testing 3D vision on a external monitor, wearing the fabulous 3D Vision glasses.Some things to note if you want to set up this follows. First of all you need the 3D Vision glasses and USB embitter, obviously. For example DevinSense has some remaining stock, or you can be lucky on second hand sites like ebay.
Second you need to install the “Release 418 family” of drivers. But that actually means a range of drivers, including the 425.31 driver I just tested and can confirm worked well. As Nvidia writes in their release notes “This driver release is from the Release 418 family of drivers (versions 418.xx to 420.xx, and 425.xx to 429.xx).”, for which there is 3D Vision Support.
Third, you need a “3D Vision Ready” monitor. It is actually not enough with a 120hz+ monitor, it need ot have this marking to work properly. A common one you can still find in the market is Asus VG248QE.
And forth, but not least important: you need to hook up the monitor with a proper cable. DVI is not enough. You need something that can handle “dual-link” speeds and give you the option of running the screen in 120hz. DisplayPort does, so I use a mini-displayport (laptop) to displayport (monitor) cable and that works fine!
If things work well you can right click on the desktop, select “configure stereoscopic 3d” and activate it by following the guide. Good luck!
In a previous post we discussed H3DAPI as a useful API for creating visuo-haptic applications. Another great API is Chai3D. I use it for most small applications I develop these days. It is a smaller framework and rely on purely imperative C++. Together with the single-file examples it makes it straight-forward to transit from getting-started to making advanced haptic effects, given that you are comfortable programming C++. Chai3D is developed by people from several universities and companies and used for example in courses at University of Calgary and KTH.
Chai3D is modular and device agnostic, so one way to use it for only abstracting the haptic device, i.e. you can easily develop an application that works with haptic devices of different brands. The latest release of Chai3d is 3.2, and I have a branch on github for haptikfabriken support. The branch also includes windows binaries of haptikfabriken api so you could get started very quickly if you like. For Linux it is also straight-forward, just clone, build and make install haptikfabrikenapi first, then continue with Chai3d.
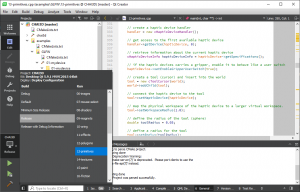
The build system of Chai3D is cmake (there are other pre-made projects but they do not include haptikfabriken support). Either use cmake-gui to configure and generate e.g. a visual studio project, or open and configure it directly in QtCreator. I prefer the latter, since I like this cross-platform IDE, even for non-qt projects.
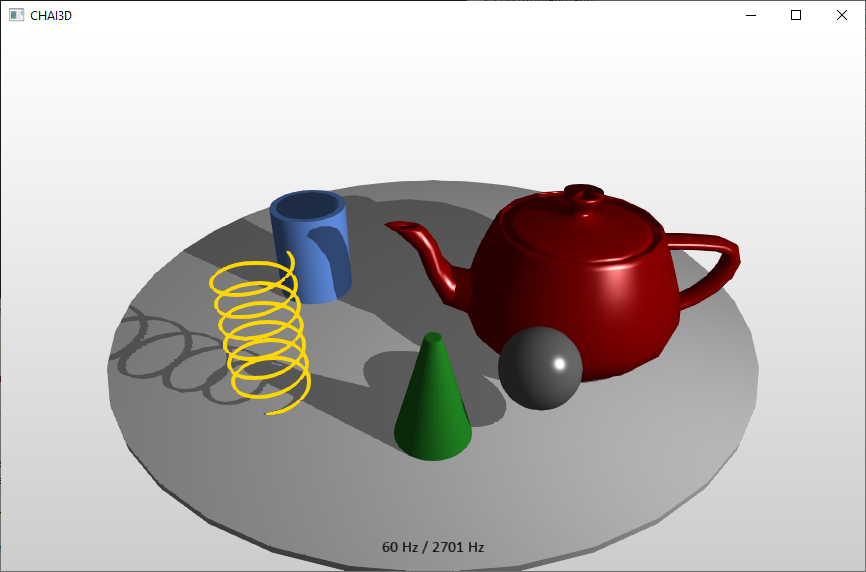
The example in the header picture with the teapot is 13-primitives, shown above in QtCreator. As an example, here is how to initialize a haptic device and connect it with a “tool” that handles the collision detection and response using the algorithm described by Ruspini et al (in Chai3d it is called finger proxy).
// create a haptic device handler
handler = new cHapticDeviceHandler();

// get access to the first available haptic device
handler->getDevice(hapticDevice, 0);

// retrieve information about the current haptic device
cHapticDeviceInfo hapticDeviceInfo = hapticDevice->getSpecifications();

// if the haptic devices carries a gripper, enable it to behave like a user switch
hapticDevice->setEnableGripperUserSwitch(true);

// create a tool (cursor) and insert into the world
tool = new cToolCursor(world);
world->addChild(tool);

// connect the haptic device to the tool
tool->setHapticDevice(hapticDevice);

// map the physical workspace of the haptic device to a larger virtual workspace.
tool->setWorkspaceRadius(1.0);

// define the radius of the tool (sphere)
double toolRadius = 0.05;

// define a radius for the tool
tool->setRadius(toolRadius);
The actual haptic rendering is explicitly called from a user-initialized haptic thread, running at 1000+ times per second, making it easy to follow how it actually is done, if you step into the code:
// update position and orientation of tool
tool->updateFromDevice();

// compute interaction forces
tool->computeInteractionForces();

// send forces to haptic device
tool->applyToDevice();
Another example that is built using Chai3D is the demo application shown at EuroHaptics. In addition it uses Bullet for physics simulation, for which there is a module within Chai3D.
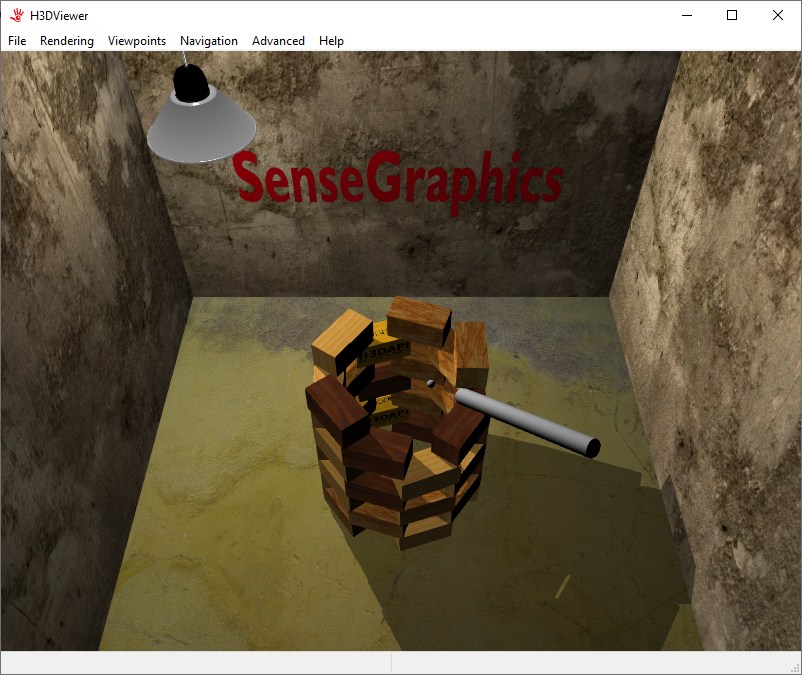
Building a graphics & haptics application is greatly simplified with the use of an API designed specifically for taking the advantage of 3D haptics. One such API is H3DAPI, developed by SenseGraphics, a subsidy of SurgicalScience. Fun note, SenseGraphics’ headquarter is only a few kilometers from Forsslund Systems here in Stockholm county, Sweden, so you don’t have to travel far for great software and hardware development.
As of writing the latest version of H3D is 2.4, and works both in Windows and Linux. For Windows it is recommended to get the H3DApi-Full-2.4.0.exe from here, and then apply our haptikfabrikenapi patch and recompile, or just extract the pre-compiled binaries into your installed folder of H3DAPI (replacing current files). Linux users would most likely build from source, checking out from the subversion repository for the 2.4 release. Note that this is a meta-repo, so you will get more files than shown if you just browse it.
H3D is mainly declarative, in that it is designed to render scenes described in the XML-based markup language X3D. H3DAPI can render any X3D scene, and comes with a stand-alone viewer and console-based loader for doing so. And since X3D is extendable can a scene author, using only a text editor, add haptic properties to visual objects like friction, stiffness etc which can be perceived interactively with a 3D haptic device.
When developing a larger app you will probably need to extend the API through custom-made libraries, something we have done for the Kobra Simulator when we developed the open-source forssim H3D extension. Forssim adds the ability to drill in virtual models, in particular models of bone and teeth, with both visual and haptic feedback. The declarative X3D is combined with imperative EcmaScript (Javascript) snippets, to handle the “game logic” of the simulation, in a similar way that most modern websites combine HTML and JavaScript. H3D also support Python as interpreter.
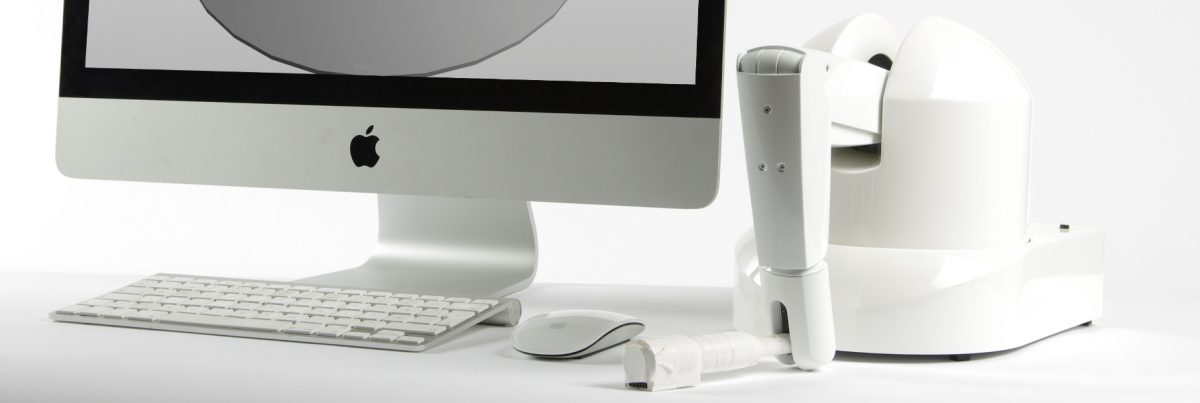
Teensy microcontroller working as an Polhem emulator
I have been working for some time on the API to the Polhem haptic device and it is working fine now, both in Linux and Windows. Still there is better performance in Linux (up to 9 khz measured) but over 2.5 khz in Windows is not bad at all. We can still improve that and I have some ideas how, but for now lets discuss how you can get started with the API and some of its benefits.
Get haptikfabrikenapi from Github and build it from source (open source, indeed) following the instructions on the github page (README.md). Take a look at the example code in examples/terminal/terminalapp.
The first example opens the communication with the haptic device, reads the manipulandum (stylus) position, prints it to the screen and commands a force to the center of the workspace:
#include <iostream>
#include "haptikfabrikenapi.h"
#include <conio.h> // For _kbhit(), see full example for Linux alternative.

using namespace std;
using namespace haptikfabriken;

int main(){
    cout << "Welcome to Haptikfabriken API!\nPress any key to close.\n";

    // Select model
    Kinematics::configuration c = Kinematics::configuration::polhem_v3();

    // Create haptics communication thread.
    HaptikfabrikenInterface hfab(c, HaptikfabrikenInterface::USB);

    // Open the communcication
    hfab.open();

    while(!_kbhit()){
        // Get position (last received)
        fsVec3d pos = hfab.getPos();

        // Get orientation of manipulandum
        fsRot orientation = hfab.getRot();

        // Print position (note that printing to terminal is "slow")
        std::cout << "\nPosition: \n"
                  << pos.x() << ", " << pos.y() << ", " << pos.z()
                  << "\nOrientation: \n" << toString(orientation);

        // Compute a force
        fsVec3d f = -100 * pos;

        // Set force
        hfab.setForce(f);
    }

    hfab.close();
    return 0;
}
Please note that the cout in this example is making the loop slow, but since we are rendering a simple spring with low stiffness (100 N/m) it is fine as an example. Remove the cout in a real application.
To have a more interesting case, let’s render a surrounding box:
double k=200;  // stiffness
double b=0.03; // = 6 cm sides
double x=pos.x();
double y=pos.y();
double z=pos.z();
double fx,fy,fz;
fx=0;fy=0;fz=0;

if(x >  b) fx = -k*(x-b);
if(x < -b) fx = -k*(x+b);
if(y >  b) fy = -k*(y-b);
if(y < -b) fy = -k*(y+b);
if(z >  b) fz = -k*(z-b);
if(z < -b) fz = -k*(z+b);

f = fsVec3d(fx,fy,fz);
For those of you who would like more details of what is going on in the controls of the device, you can request more information, e.g:
Actually, there is a built-in http server that provides this information and more as a human-readable JSON object at http://localhost:8088. It also serves as gateway for incoming messages like button actions from Bluetooth. In a production build you can of course disable the web server altogether.
As an alternative to maintaining your own loop you can use the observer pattern, in which you implement a callback to when new position messages arrive from the haptic device:
class MyHapticListener : public HapticListener {
       void positionEvent(HapticValues& hv){
           // Print every 1000th position for info.
           if((msgcount++)%1000==0)
               std::cout << "Pos: " << toString(hv.position) << "\n";

           // Compute force
           fsVec3d f = -100 * hv.position;

           // Set the force to be rendered on device
           hv.nextForce = f;
       }
       int msgcount{0};
};

int main()
{
    Kinematics::configuration c = Kinematics::configuration::polhem_v3();
    HaptikfabrikenInterface hfab(c, HaptikfabrikenInterface::USB);
    hfab.open();

    // Add our listener
    MyHapticListener* myHapticListener = new MyHapticListener;
    hfab.addEventListener(myHapticListener);

    // Main loop, do nothing here
    while(!_kbhit()){}

    // Remove listener
    hfab.removeEventListener(myHapticListener);
    delete myHapticListener;
    myHapticListener = nullptr;
}
Finally, and to refer back to the picture at the top of this post. You can start developing even without a haptic device. Just get a Teensy 4.0 and load it with the latest firmware and you will always have a haptic device on hand to test with. We currently use that exact board as the main microcontroller in the Polhem device. And it is super fast! I have a small break-out as well so that I can turn some encoder knobs while debugging. If you would like to play with this, let me know and I send the latest firmware etc.
Oh, and this code works just as well with WoodenHaptics. Just use Kinematics::configuration::woodenhaptics_v2015() for example.
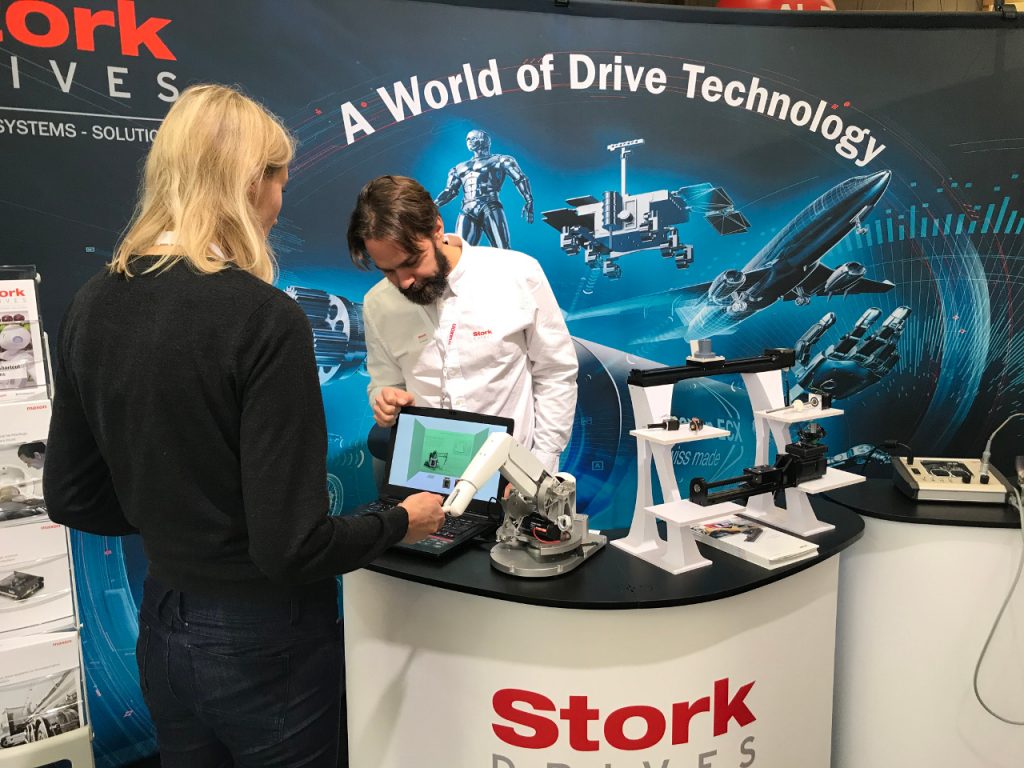
Forsslund Systems office is located in Sundbyberg, in northern Stockholm, and by coincidence you can take a short walk along the lake and arrive at another cool company; Stork Drives. They are a subsidiary of Maxon Motors in Switzerland, which makes the high precision motors and we use in our haptic devices. Last week they asked if I have something cool to show that they could exhibit in their booth at Elmia Subcontractor, an annual trade fair in southern Sweden. Well, of course I have! So the demo from Tallinn is making another public appearance. If you are there, please come by.
On October 23, 2019, we officially displayed the Polhem haptic device for the first time, during Euro VR 2019, which was held in Tallin, Estonia. The demo went very well and we received the best demo award. Most popular among the applications we displayed was a simulation of virtual boxes that could be lifted up, stacked and pushed around, providing both contact forces, gravity and friction. This application was previously developed by us on commission from KTH, for use in collaborative haptics research. I am planning to write another blog post about that application further on.
The full 2-page paper introducing Polhem and the demo can be found here.
The EuroVR conference itself was very nice. Actually one of the best organised events I have been to. It was held in Mektory, which is part of TalTech, which gave it a very creative and cool atmosphere. The Mektory building is remodeled from an old industry or office building, providing super modern interiors with the latest display- and computer technologies. Many rooms have company or embassy sponsors, for example Samsung sponsored a room full of tablet computers where kids could come and make physically animated stop-motion movies. Several countries had sponsored rooms, with interiors from their culture, e.g. Japan had a room with lots of wood and where you had to take off your shoes to enter. In the basement they had some manufacturing equipment, including industrial robots, for students and start-ups to use. The conference itself was also nice, featuring broad applications of VR, for example in architecture and in car design.
Today we are exhibiting at TEI Conference 2018. It is a sneak preview of what is coming, in addition to showing the ever popular WoodenHaptics + Chai 3D virtual vinyl record scratching demo.
When I showed a sneak-preview of this site and blog for some friends they saw the picture of an antique factory and wondered if we had moved to Skansen, the famous outdoor museum of Stockholm, where it is situated. Well, of course not, but the picture illustrates well our intentions: an actual factory albeit small-scale, craftsmanship and action. Let me explain this and then show some real pictures of our lab.Continue reading “Lab Inauguration”


 We are introducing the new haptic device Polhem in a first public pre-view at EuroVR 2019! Come visit us in the demo exhibition.